In our earlier post, we figured out how to write a word count program in spark. However, when dealing with spark projects, we always have to look at a lot of numbers/visualizations to fine tune our job.
So, let use configure a apache hadoop cluster in pseudo-distributed mode, which will give us a production like environment, and also provide yarn UI from where we can see what our spark jobs are up to.
I suggest you follow the apache spark installation guide, before proceeding with below steps.
Step 1: Download, Extract and Link Apache Hadoop
Following our directory structure and similar process from the spark installation guide, we will now download a hadoop archive, extract it and create a soft link.
wget https://archive.apache.org/dist/hadoop/common/hadoop-3.2.1/hadoop-3.2.1.tar.gz -P ~/Downloads/installation_packages
tar -xzf ~/Downloads/installation_packages/hadoop-3.2.1.tar.gz -C ~/Applications/extracts
ln -s ~/Applications/extracts/hadoop-3.2.1 ~/Applications/Hadoop
You can choose to download other versions from https://hadoop.apache.org/releases.html.
Step 2: Set environment variables
Let's quickly set all the environment variables that the cluster needs and also source the profile.
echo 'export HADOOP_HOME=$HOME/Applications/Hadoop' | tee -a ~/.profile > /dev/null#echo 'export HADOOP_MAPRED_HOME=$HADOOP_HOME' | tee -a ~/.profile > /dev/null
echo 'export HADOOP_COMMON_HOME=$HADOOP_HOME' | tee -a ~/.profile > /dev/null
echo 'export HADOOP_HDFS_HOME=$HADOOP_HOME' | tee -a ~/.profile > /dev/null
echo 'export HADOOP_YARN_HOME=$HADOOP_HOME' | tee -a ~/.profile > /dev/null
echo 'export HADOOP_CONF_DIR=$HADOOP_HOME/etc/hadoop' | tee -a ~/.profile > /dev/null
echo 'export PATH=$PATH:$HADOOP_HOME/bin' | tee -a ~/.profile > /dev/null
source ~/.profile
Step 3: Configure core-site.xml and hdfs-site.xml
We now have to configure a few files to turn hadoop to pseudo distributed from standalone mode. First of it is core-site.xml.
cat << EOT > $HADOOP_HOME/etc/hadoop/core-site.xml
<?xml version="1.0" encoding="UTF-8"?>
<?xml-stylesheet type="text/xsl" href="configuration.xsl"?>
<!-- https://hadoop.apache.org/docs/r3.2.1/hadoop-project-dist/hadoop-common/core-default.xml -->
<configuration>
  <property>
    <name>fs.defaultFS</name>
    <value>hdfs://localhost:9000</value>
  </property>
</configuration>
EOT
Then we set the default directories for namenode, datanode and replication factor for hdfs in hdfs-site.xml.
cat << EOT > $HADOOP_HOME/etc/hadoop/hdfs-site.xml
<?xml version="1.0" encoding="UTF-8"?>
<?xml-stylesheet type="text/xsl" href="configuration.xsl"?>
<!-- https://hadoop.apache.org/docs/r3.2.1/hadoop-project-dist/hadoop-hdfs/hdfs-default.xml -->
<configuration>
  <property>
    <name>dfs.name.dir</name>
    <value>$HOME/hdfs/namenode</value>
  </property>
  <property>
    <name>dfs.data.dir</name>
    <value>$HOME/hdfs/datanode</value>
  </property>
  <property>
    <name>dfs.replication</name>
    <value>1</value>
  </property>
</configuration>
EOT
Step 4: Configure mapred-site.xml and yarn-site.xml
We will now similarly configure the mapred-site.xml.
cat << EOT > $HADOOP_HOME/etc/hadoop/mapred-site.xml
<?xml version="1.0" encoding="UTF-8"?>
<?xml-stylesheet type="text/xsl" href="configuration.xsl"?>
<!-- https://hadoop.apache.org/docs/r3.2.1/hadoop-mapreduce-client/hadoop-mapreduce-client-core/mapred-default.xml -->
<configuration>
  <property>
    <name>mapreduce.framework.name</name>
    <value>yarn</value>
  </property>
  <property>
    <name>mapreduce.application.classpath</name>
    <value>$HADOOP_MAPRED_HOME/share/hadoop/mapreduce/*:$HADOOP_MAPRED_HOME/share/hadoop/mapreduce/lib/*</value>
  </property>
  <property>
    <name>mapreduce.map.memory.mb</name>
    <value>256</value>
  </property>
  <property>
    <name>mapreduce.reduce.memory.mb</name>
    <value>256</value>
  </property>
  <property>
    <name>yarn.app.mapreduce.am.resource.mb</name>
    <value>256</value>
  </property>
  <property>
    <name>mapreduce.map.java.opts</name>
    <value>-Xmx192m</value>
  </property>
  <property>
    <name>mapreduce.reduce.java.opts</name>
    <value>-Xmx192m</value>
  </property>
  <property>
    <name>yarn.app.mapreduce.am.command-opts</name>
    <value>-Xmx192m</value>
  </property>
</configuration>
EOT
And now the very important, yarn-site.xml. Note the below points while going through the configuration.
- I am running a VM with 5 core allocation, so I am setting max cpu resources yarn can allocate to 4. I need one to keep the OS functioning properly
- I am running the VM with 4 GB memory allocation, so I am setting max memory yarn can allocate to 3 GB. Again, need 1 GB for the OS to not freeze
- The scheduler allocations of min/max cpu and memory is per executor
- Although 1024 MB is the maximum memory set to be allocated to the executor, there will be a 384 MB overhead, i.e., a executor can claim max 1024 - 384 = 640 MB of memory
cat << EOT > $HADOOP_HOME/etc/hadoop/yarn-site.xml
<?xml version="1.0" encoding="UTF-8"?>
<?xml-stylesheet type="text/xsl" href="configuration.xsl"?>
<!-- https://hadoop.apache.org/docs/r3.2.1/hadoop-yarn/hadoop-yarn-common/yarn-default.xml -->
<configuration>
  <property>
    <name>yarn.nodemanager.aux-services</name>
    <value>mapreduce_shuffle</value>
  </property>
  <property>
    <name>yarn.nodemanager.env-whitelist</name>
    <value>JAVA_HOME,HADOOP_COMMON_HOME,HADOOP_HDFS_HOME,HADOOP_CONF_DIR,CLASSPATH_PREPEND_DISTCACHE,HADOOP_YARN_HOME,HADOOP_MAPRED_HOME</value>
  </property>
  <property>
    <name>yarn.nodemanager.resource.cpu-vcores</name>
    <value>4</value>
  </property>
  <property>
    <name>yarn.nodemanager.resource.memory-mb</name>
    <value>3072</value>
  </property>
  <property>
    <name>yarn.scheduler.minimum-allocation-vcores</name>
    <value>1</value>
  </property>
  <property>
    <name>yarn.scheduler.maximum-allocation-vcores</name>
    <value>2</value>
  </property>
  <property>
    <name>yarn.scheduler.minimum-allocation-mb</name>
    <value>128</value>
  </property>
  <property>
    <name>yarn.scheduler.maximum-allocation-mb</name>
    <value>1024</value>
  </property>
  <property>
    <name>yarn.scheduler.increment-allocation-mb</name>
    <value>64</value>
  </property>
  <property>
    <name>yarn.timeline-service.enabled</name>
    <value>true</value>
  </property>
</configuration>
EOT
Step 5: Configure passwordless SSH
If you don't already have openssh-server installed on your OS, install it and start it.
sudo apt install -y openssh-server
sudo service sshd start
Now, let's create ssh keys for hadoop services to communicate with each other. The below command will wipe of already existing ssh keys, back them up with a different file name.
ssh-keygen -t rsa -P '' -f ~/.ssh/id_rsa
cat ~/.ssh/id_rsa.pub > ~/.ssh/authorized_keys
chmod 600 ~/.ssh/authorized_keys
Now try if you can ssh into your own system. If you can, proceed, else fix the issue.
ssh localhostStep 6: Set Java Path in hadoop-env.sh
This is a workaround for an issue, you now have to header over to $HADOOP_HOME/etc/hadoop/hadoop-env.sh and replace line 54 with the JDK path on your system.
If you followed the spark installation post, the below should work for you,
export JAVA_HOME=/home/<YOUR_USERNAME>/Applications/JDKStep 7: Format namenode
After all the above configurations, we can finally format the namenode now to hdfs fileformat.
hdfs namenode -formatStep 8: Let's hit it
It's time to start our cluster now and ensure everything works.
$HADOOP_HOME/sbin/start-all.shYou can check if all services have started using the jps command.

Step 9: Create hdfs directories
Let us now create few directories in hdfs, one will be your home directory and the other one for spark history server.
hdfs dfs -mkdir -p /user/<YOUR_USERNAME>
hdfs dfs -mkdir -p /logs/spark
Step 10: Enable Spark History Server
Spark, by default, does not store history. But we will need this to debug and tune our future projects. So, let's set the configuration in spark-defaults.conf.
cat << EOT > $SPARK_HOME/conf/spark-defaults.conf
# https://spark.apache.org/docs/3.0.0/configuration.html
spark.eventLog.enabled           true
spark.eventLog.dir               hdfs://localhost:9000/logs/spark
spark.history.fs.logDirectory    hdfs://localhost:9000/logs/spark
spark.eventLog.compress          true
spark.serializer                 org.apache.spark.serializer.KryoSerializer
spark.driver.memory              512m
spark.executor.memory            512m
EOT
Note how I am sepcifying hdfs directories through namenode (port 9000), setting lz4 (default) compression of logs, enabling Kryo serializer and also setting default executor memory for spark jobs.
If you set up the above, you will always have to start the cluster first before running any spark job (even in local mode).
Step 11: Start spark history server
We can now start the spark history server with below command.
$SPARK_HOME/sbin/start-history-server.shStep 12: The UIs
After start all the above services, we will have the following UI up and running for us.
At http://localhost:8088, we will have the Yarn UI

At http://localhost:9870, we will have the HDFS UI (if you use hadoop 2.x or older, the port will be 50070)

Spark history server will be available at http://localhost:18080.
Here is an example of our word count program, run with 2 executors and 512 MB memory.
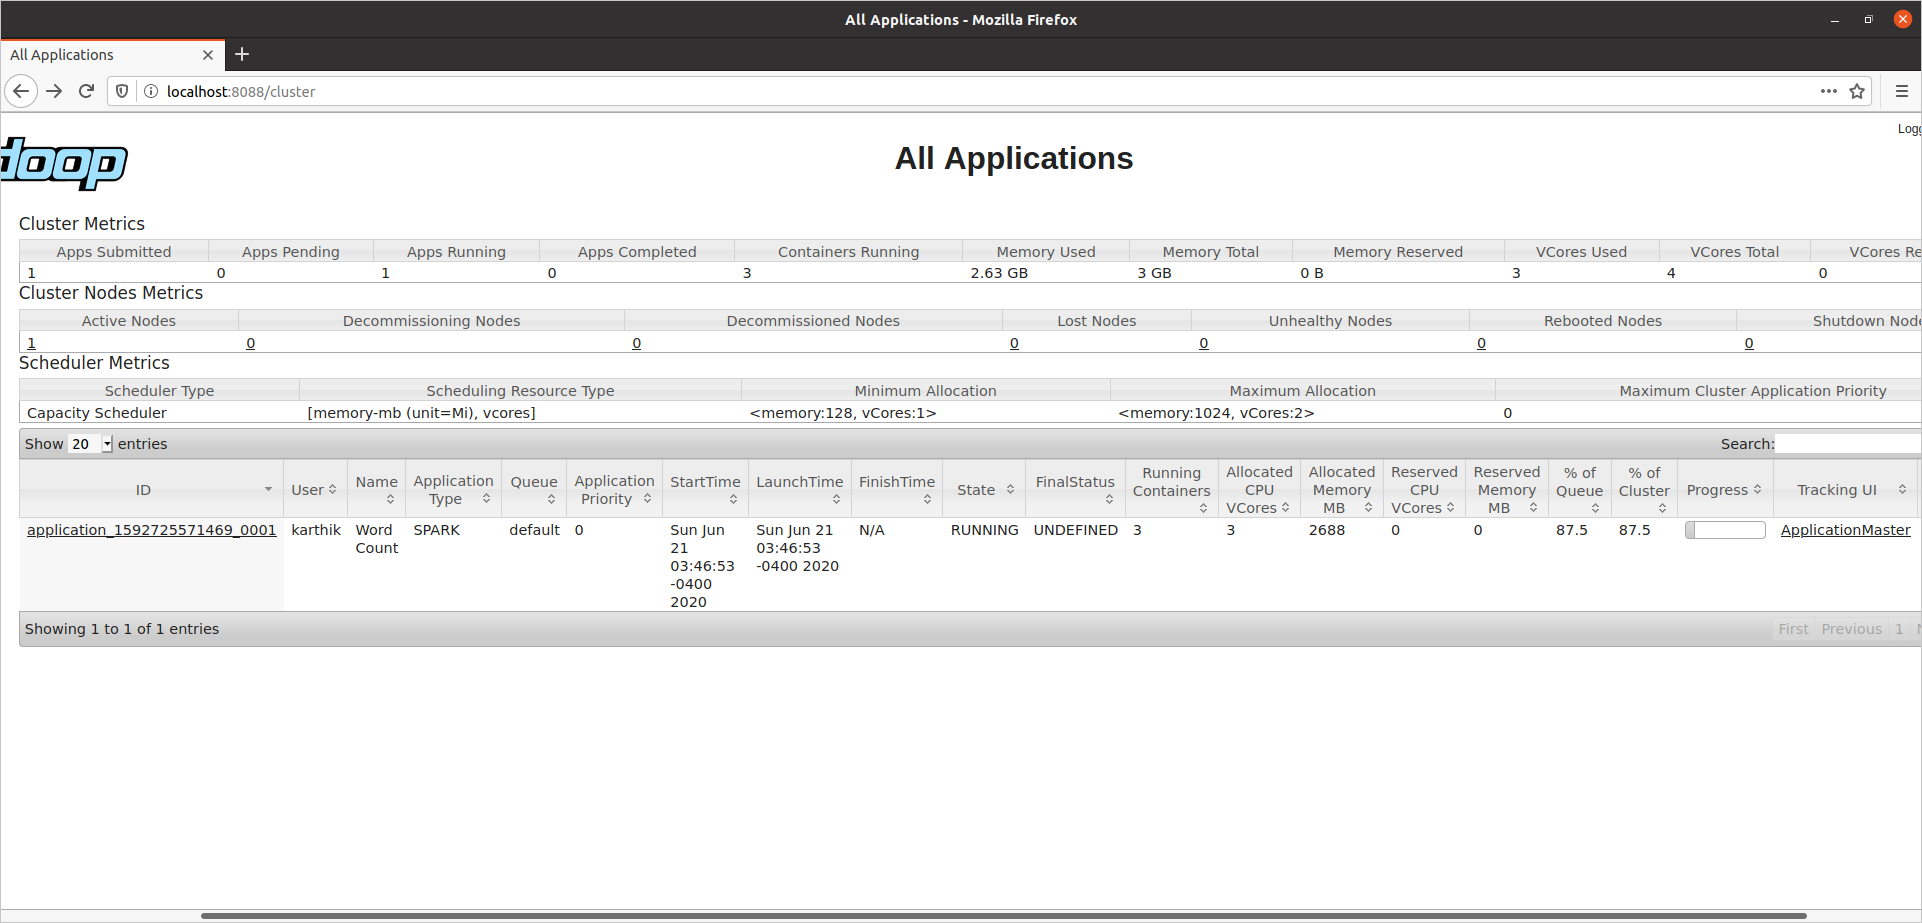
See that it takes 2688 MB of memory, i.e., (512 MB + 384 MB) * (1 driver + 2 executors)
Step 13: Stopping Services
You can stop the services using below commands.
$SPARK_HOME/sbin/stop-history-server.sh
$HADOOP_HOME/sbin/stop-all.sh
For easier start/stop of services, you can create aliases in your bash profile and use "startcluster" and "stopcluster".
echo 'alias startcluster="$HADOOP_HOME/sbin/start-all.sh && $SPARK_HOME/sbin/start-history-server.sh"' >> ~/.bashrc
echo 'alias stopcluster="$SPARK_HOME/sbin/stop-history-server.sh && $HADOOP_HOME/sbin/stop-all.sh"' >> ~/.bashrc
That is all! You should now be able to start and stop the hadoop pseudo distributed cluster easily.
 I am Karthik, I love exploring data technologies and building scalable data platforms.