In our previous post, we discussed how we can set up spark and pyspark. In this post, let us put up a simple boiler plate code that we can use to build many spark projects out of.
We will use gradle as our build tool. It is good to build a fat jar, i.e., a jar package containing all the dependencies packaged within it. This helps in maintaining a deployment package that does not depend on maven repository or having spark cluster that's open to internet.
Step 1: Create directories
We first create the necessary directories for our set up.
mkdir -p ~/projects/spark-boilerplate
mkdir -p ~/projects/spark-boilerplate/src/main/scala
mkdir -p ~/projects/spark-boilerplate/src/main/resources
mkdir -p ~/projects/spark-boilerplate/src/test/scala
mkdir -p ~/projects/spark-boilerplate/src/test/resources
The spark-boilerplate is the root directory of our project, the src/main/scala will hold our scala files and src/main/resources will hold our properties or other files that's required for the application.
The src/test/scala will hold the scala files that we use to write unit tests and the src/test/resources will hold any additional files required to test the application.
Step 2: Download necessary gradle files
We have to set up the gradle wrapper on our project, however as I keep saying, I do not suggesting anything to be installed at system level. So we are going to use a temporary download of gradle to create the necessary files for our project.
Let us download and unzip the gradle library.
wget https://services.gradle.org/distributions/gradle-8.4-bin.zip -P ~/Downloads
unzip ~/Downloads/gradle-8.4-bin.zip -d /opt
Now head over to the project directory and execute the gradle wrapper command to create the gradle files in our project.
cd ~/projects/spark-boilerplate
/opt/gradle-8.4/bin/gradle wrapper --gradle-version=8.4 --distribution-type=bin --no-daemon
This should create ./gradle/wrapper/gradle-wrapper.jar, ./gradle/wrapper/gradle-wrapper.properties, ./gradlew and ./gradlew.bat. We can now delete our download, our you can choose to keep it as it is.
rm -r /opt/gradle-8.4
rm ~/Downloads/gradle-8.4-bin.zip
Step 3: Create gradle properties file
We will now create a ./gradle.properties at the root directory of our project. This file will define the various properties that will be used while building our project through gradle.
org.gradle.caching=true
org.gradle.configureondemand=true
org.gradle.daemon=false
org.gradle.jvmargs=-Xms256m -Xmx2048m -XX:MaxMetaspaceSize=512m -XX:+UseParallelGC -XX:+HeapDumpOnOutOfMemoryError -Dfile.encoding=UTF-8
org.gradle.parallel=true
org.gradle.warning.mode=all
org.gradle.welcome=never
You can choose not to disable the gradle daemon. It is one more java process that keeps running and takes up resources, so I tend to disable it. Keeping it enabled will result in saving time to initialize daemon every time you run a gradle process.
Step 4: Create the version catalog
The ./gradle/libs.versions.toml file is where we will declare all the versions and libraries that are referenced by the project. It acts as a centralized management file that we can re-use if we build multi module project or even reference from other projects.
[versions]
apache-spark = "3.5.0"
scala = "2.13.8"
scala-test = "3.2.17"

[libraries]
scala-library = { module = "org.scala-lang:scala-library", version.ref = "scala" }
scala-test = { module = "org.scalatest:scalatest_2.13", version.ref = "scala-test" }
spark-core = { module = "org.apache.spark:spark-core_2.13", version.ref = "apache-spark" }
spark-sql = { module = "org.apache.spark:spark-sql_2.13", version.ref = "apache-spark" }

[bundles]
spark = ["spark-core", "spark-sql"]
Step 5: Create gradle build file
The ./build.gradle.kts file is where we define dependencies of the project and also configure various tasks that we will need.
plugins {
    scala
}

project.group = "com.barrelsofdata"
project.version = "1.0.0"

dependencies {
    compileOnly(libs.scala.library)
    compileOnly(libs.bundles.spark)

    testImplementation(libs.scala.test)
}

tasks.withType<Test>().configureEach {
    maxParallelForks = (Runtime.getRuntime().availableProcessors() / 2).coerceAtLeast(1)
}

configurations {
    implementation {
        resolutionStrategy.failOnVersionConflict()
    }
    testImplementation {
        extendsFrom(configurations.compileOnly.get())
    }
}

tasks.register<JavaExec>("scalaTest") {
    dependsOn("testClasses")
    mainClass = "org.scalatest.tools.Runner"
    args = listOf("-R", "build/classes/scala/test", "-o")
    jvmArgs = listOf("-Xms128m", "-Xmx512m", "-XX:MetaspaceSize=300m", "-ea", "--add-exports=java.base/sun.nio.ch=ALL-UNNAMED") // https://lists.apache.org/thread/p1yrwo126vjx5tht82cktgjbmm2xtpw9
    classpath = sourceSets.test.get().runtimeClasspath
}

tasks.withType<Test> {
    dependsOn(":scalaTest")
}

tasks.withType<Jar> {
    manifest {
        attributes["Main-Class"] = "com.barrelsofdata.sparkexamples.Driver"
    }
    from (configurations.runtimeClasspath.get().map { if (it.isDirectory()) it else zipTree(it) })
    archiveFileName.set("${archiveBaseName.get()}-${project.version}.${archiveExtension.get()}")
}

tasks.clean {
    doFirst {
        delete("logs/")
    }
}
Note how we add spark dependencies as compileOnly. This is because, we do not need these to be part of our fat jar. The spark libraries will be available on the cluster where we run the job.
Step 6: Create gradle settings file
This will be ./settings.gradle.kts in the root of the project. This will provide the project name and also provisions the dependencies that we declared in the previous steps.
pluginManagement {
    repositories {
        mavenCentral()
        gradlePluginPortal()
    }
}

dependencyResolutionManagement {
    repositories {
        mavenCentral()
    }
}

rootProject.name = "spark-boilerplate"
Step 7: Create driver class
Any spark job would need a main class that runs on the driver. This is the class that would hold our main method. Let us first create the package structure com.barrelsofdata.sparkexamples
mkdir -p ~/projects/spark-boilerplate/src/main/scala/com/barrelsofdata/sparkexamplesAnd now for the Driver class, the below code initializes a SparkSession and uses spark.sql() to output a simple query output. We also write log messages just to ensure our logs are working. This will be called Driver.scala and will go into the package we created above.
package com.barrelsofdata.sparkexamples

import org.apache.log4j.Loggerimport
import org.apache.spark.sql.SparkSession

object Driver {
  val JOB_NAME: String = "Boilerplate"
  val LOG: Logger = Logger.getLogger(this.getClass.getCanonicalName)

  def main(args: Array[String]): Unit = {
    val spark: SparkSession = SparkSession.builder().appName(JOB_NAME).getOrCreate()
    spark.sql("SELECT 'hello' AS col1").show()
    LOG.info("Dummy info message")
    LOG.warn("Dummy warn message")
    LOG.error("Dummy error message")
  }
}
Step 8: Create unit testing setup
Unit testing is of utmost importance for any project, the tests validate that the code is functioning as it should and helps prevent any unexpected situations arising in production.
We create a similar package in our src/test directory and also create a DriverTest class.
package com.barrelsofdata.sparkexamples

import java.util.Properties
import org.apache.log4j.{LogManager, Logger, PropertyConfigurator}
import org.apache.spark.sql.SparkSession
import org.scalatest.BeforeAndAfterAll
import org.scalatest.funsuite.AnyFunSuite

class DriverTest extends AnyFunSuite with BeforeAndAfterAll {
  val JOB_NAME: String = "Driver Test Job"
  val LOGGER_PROPERTIES: String = "log4j-test.properties"
  val LOG: Logger = Logger.getLogger(this.getClass.getCanonicalName)
  var spark: SparkSession = _

  def setupLogger(): Unit = {
    val properties = new Properties
    properties.load(getClass.getClassLoader.getResource(LOGGER_PROPERTIES).openStream())
    LogManager.resetConfiguration()
    PropertyConfigurator.configure(properties)
  }

  override def beforeAll(): Unit = {
    setupLogger()
    LOG.info("Setting up spark session")
    spark = SparkSession.builder().appName(JOB_NAME).master("local[*]").getOrCreate()
  }

  override def afterAll(): Unit = {
    LOG.info("Closing spark session")
    spark.close()
  }

  test("Check if spark session is working") {
    LOG.info("Testing spark job")
    assertResult("hello")(spark.sql("SELECT 'hello'").collect().head.get(0))
  }
}
Do note that this is just a dummy class and is not referring to any functionality from the driver. We just create this to ensure our build process runs through the test.
Step 9: Create logger properties
We will now create a properties for the log4j logger, to be sued during tests. This will go into src/test/resources/log4j-test.properties. We are disabling all WARN and below level logs of spark, but keeping INFO and above logs for our project.
log4j.rootLogger=INFO, console
log4j.logger.com.barrelsofdata.sparkexamples=INFO, console
log4j.additivity.com.barrelsofdata.sparkexamples=false
log4j.appender.console=org.apache.log4j.ConsoleAppender
log4j.appender.console.target=System.out
log4j.appender.console.immediateFlush=true
log4j.appender.console.encoding=UTF-8
log4j.appender.console.layout=org.apache.log4j.PatternLayout
log4j.appender.console.layout.conversionPattern=%d{yyyy/MM/dd HH:mm:ss} %p %c: %m%n
log4j.logger.org.apache=ERROR
log4j.logger.org.spark_project=ERROR
log4j.logger.org.sparkproject=ERROR
log4j.logger.parquet=ERROR
We will not add a logger to our application in this post, as the logger cannot be configured programmatically for cluster running jobs.
Step 10: Readme file
No project is complete without a readme file. People looking at your project should know what it is about and have all the necessary instructions right there. So, let's create a README.md file in the root directory.
# Spark Boilerplate
This is a boilerplate project for Apache Spark. The related blog post can be found at [https://barrelsofdata.com/spark-boilerplate-using-scala](https://barrelsofdata.com/spark-boilerplate-using-scala)
## Build instructions
From the root of the project execute the below commands
- To clear all compiled classes, build and log directories
```shell script
./gradlew clean```
- To run tests
```shell script
./gradlew test```
- To build jar
```shell script
./gradlew build```
## Run
```shell script
spark-submit --master yarn --deploy-mode cluster build/libs/spark-boilerplate-1.0.0.jar```
Step 11: Create gitignore file
Every project needs to be maintained through a version control system, and I prefer Git. We will have a lot of temporary files or unrelated files that shouldn't make it to the repository.
We use the below setup for .gitignore file in the root of our project.
# Compiled classes
*.class
# Gradle files
.gradle
# IntelliJ IDEA files
.idea
# Build files
build
# Log files
*.log
logs
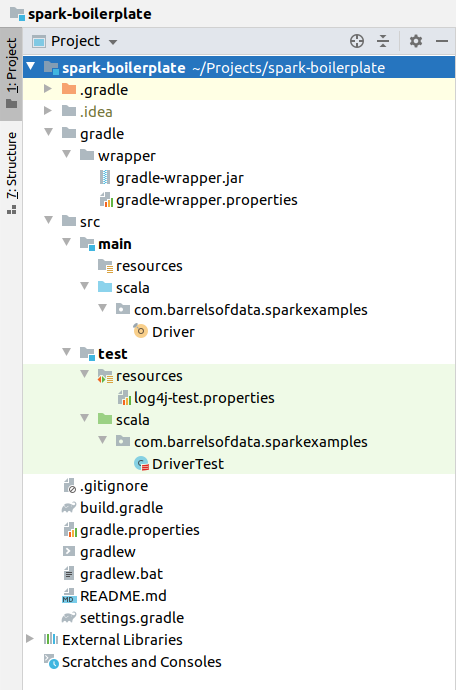
At the end of all these, your directory structure structure would look like this:

Step 12: Test, Build and Run
Finally, it is time to check if all our above setup is working. We first test and build the project, this will create a jar file in ./build/libs directory with name spark-boilerplate-1.0.0.jar.
./gradlew clean test buildYou should see a report saying the tests passed and build successful. We can now run the jar on spark and check if our project is working.
spark-submit --master yarn --deploy-mode client ~/projects/spark-boilerplate/build/libs/spark-boilerplate-1.0.0.jarUse --master local[*] without deploy-mode, if you have not set up a hadoop cluster in pseudo distributed mode.

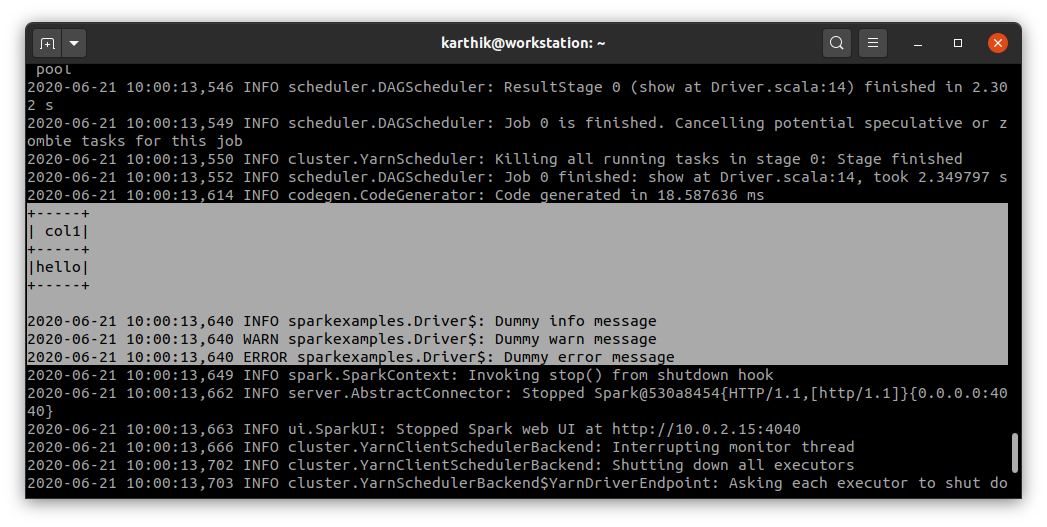
If you get a output with the query results and log messages as shown above, you have successfully created the boilerplate project for spark. We can now use this to build many more projects, while not bothering about setting up the base again.
You can find the above project on git, as a template repository, at https://git.barrelsofdata.com/barrelsofdata/spark-boilerplate.

 I am Karthik, I love exploring data technologies and building scalable data platforms.